


Special thanks to my fellow members in Omnia Vinat Amor/Excusez-Moi (The core members are essentially the same, heh) for sharing their builds with me.
Very special thanks to everyone who has given me corrections and expanded notes. They'll be credited in the changelog at the bottom.
While individual builds may vary, what I will outline are general gameplay tips for priests, my personal build (+ the builds of a couple of guild members!) and a detailed explanation of every skill usable by an Arch Bishop.
This is the first guide I have ever written, please be gentle internets  .
.
I do not guarantee perfect accuracy or knowing all the applications of every skill, but I can definitely try.
Latest updates:
12:33AM server time, June 17/14
-> Stealth edit! Changed my stats build
-> Yesh I'm alive
-> Might have a gear section coming in!
8:21PM server time, September 3/13
-> Added skill icons
-> Added hotkeys note
-> noted that top warp portal in a stack of warps takes priority
-> noted WoE priests may consider res 1
-> Added assumptio's duration
-> Added that you can't self-cancel Basilica
-> noted Gloria helps resist Mandragora Howling
-> noted that KE1 is a prerequisite for Praef
-> noted effects of L. Aeterna in regards to LoV and BB
-> Added rangers to potential targets for Sacrament
* edits for readability
+ rewrite introduction in the future?
+ Make note on job bonus?
Head to the bottom for the full changelog! (#CHNG)
Table of Contents:(#WHERE)
(Use CTRL + F to find what you're looking for!)
Each section is not organized in any particular order.
0. Table of Contents (#WHERE)
1. Game Mechanics notes (#MECH)
2. Stats (#STATS)
3. Example builds (#BUILD)
3.1 Syriti, FS PvM
3.2 Bearer of Light, FS PvM
3.3 Chocolate Milk, FS WoE
3.4 Noihara Himari, FS WoE/PvM hybrid
4. Skill descriptions (#DESC)
4.1 Acolyte (#ACO)
4.2 Priest (#PRI)
4.3 High Priest (#HP)
4.4 Arch Bishop (#AB)
5. Closing notes (#KTHXBAI)
6. Changelog (#CHNG)
1. Game Mechanics notes:(#MECH)
Class bases: Base HP/SP refers to the natural HP/SP a character has assuming their VIT and INT are 0. These bases are determined by the character's class, level, and whether or not they are transcended. (Transcendent characters receive a 25% boost to their natural HP/SP compared to non-transcendent characters.)
Casting Time: Most skills that have a cast time have two types of cast time. They will have a variable and a fixed cast time component. Fixed cast time is generally not reducible, and is usually quite short. Variable cast time is typically much longer but is affected and reduced by stats such as DEX, INT, or equipment. Of course, there are exceptions to this general pattern of cast time.
Skill Re-Use Delay: Skill cooldown and delay are two different things. Cooldown is for one particular skill and delay affects the ability to use any skill. Usually third class skills have both a delay and a much longer cooldown component. 1st and 2nd class skills usually only have a delay.
ASPD Delay: This is the third type of limiter of casting speeds, this delay is present for all skills in the game. Having higher ASPD will make your character go through their casting animations faster (such as how a higher ASPD would make your character go through unskilled melee attacks faster), thus reducing the time between skill use further. The effect of higher ASPD is best noticed when under the effect of the bard's Magic Strings, as priest skills have a high static delay. (I would not recommend adding tons of AGI for this, as you will not always have Magic Strings)
Hitlock: If a character or monster is successfully attacked rapidly, they can be locked in the 'flinch' animation and be unable to move. This is a main cause of position glitching (standing between spaces), and 'lag hookshots' (http://adultimum.net/rw/304/ Safe for work, I promise!) from monsters. There are a few (but not many) ways to prevent flinching, such as the Swordsman's Endure skill, Anodyne item (Casts Endure 1), casting Kyrie Eleison (only effective if the mob isn't large enough to slice through the shield immediately), or equipping an Eddga carded pair of shoes.
Hotkeys: Priests have the largest repertoire of useful skills in the game. It's important to hotkey as many as possible! Typically you should put your more used skills closer together. Press F12 in-game to open more hotkey bars! (up to 4).
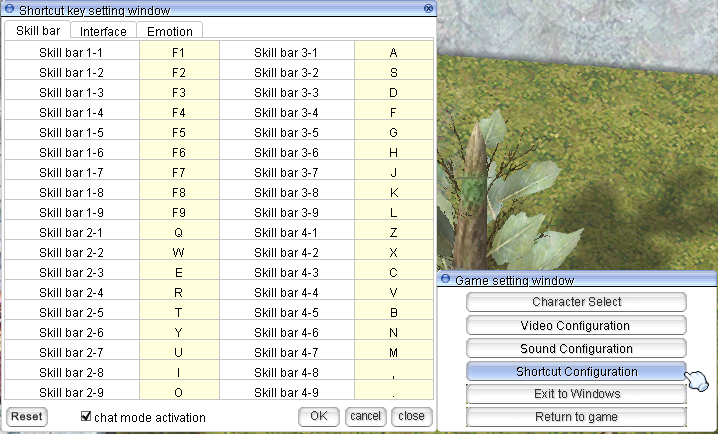

My hotkeys have been set up so that the skills that require faster reaction to use (such as Sanctuary, Safety Wall, and all variants of Heal) are closer together. My hotkeys were setup as a right-handed person, hence why the higher priority skills are closer to the left side for my other hand. Those two side buttons can't be assigned to a hotkey. You can double click hotkeys with your mouse to use them.
Shift-click: Ordinarily, support skills cannot target hostiles- why would you want them to, right? In some cases where support skills may want to be used against hostiles (such as casting Heal against undead), you can hold shift and the game will allow you to do so. You can use the /ns command to bypass the holding shift step. Be aware that /ns will also make it easier to mis-fire supportive spells.
Party Chat: Communication is key to survival. Pay attention to status and situation reports made by allies. Do not grant specific buff requests if it jeopardizes the party's survival to do so at that moment. Prioritize vitality before violence. Make sure to re-arrange your chat tabs so you can see party communications clearly.
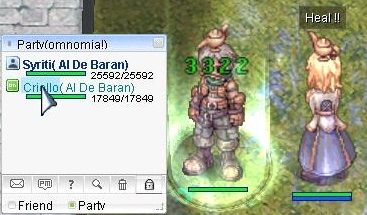
Party Window: Single target recovery and support spells can target by clicking an individual's name in the Alt + Z party roster. It will also allow you to see the exact HP values of your allies that are onscreen. You can stretch the window (by clicking the bottom right corner of the window) and see the HP of all of your allies at a glance. Make sure to also lock your party window (by clicking the padlock icon) so you don't bring up PM windows when supporting. This is critically important to keep open and use as a primary support class.
2. Stats:(#STATS)
STR:
This stat primarily grants physical attack, and +30 weight limit per base STR a character has. If you are participating in WoE, you may want some STR to carry more consumables and equipment to stay in combat longer. A Heavy Lifter Box is a necessity for WoE as increased weight limit will improve your resistance to the Shadow Chaser's Masquerade skills. Since an FS (Full Support) priest does not engage in melee combat, coupled with a serviceable base weight limit, strength is otherwise a useless stat for the Full Support build.
AGI:
This stat mainly gives a bonus to flee and ASPD (Attack Speed). AGI is useful only in large amounts. Flee suffers a penalty per hostile targeting you, plus, FS priests have no real use for ASPD, which makes agility a mediocre defense stat in which points are better spent in VIT. AGI is otherwise a good stat for preventing damage from ever occurring (and is a staple stat for battle priest builds, they need ASPD), however, magic cannot be evaded and priests obviously don't need to worry too much about conserving potions. 100 points will give an immunity to Bleed and Sleep.
VIT:
Each point of vitality gives a character +1% baseHP compared to their class base. Higher VIT improves the power of HP recovering consumables (2% per point). This means that points invested in vitality have the same effect regardless of what level you choose to invest in it. Having 100 total vitality will give an immunity to stun. I recommend investing heavily in vitality, a dead priest is a useless priest and your survival is critical for the rest of the party.
INT:
Your bread and butter. Like vitality, it increases your maxSP by 1% per point, and soft magic attack/defense. Higher INT improves the power of SP recovering consumables (2% per point). Priests receive one of the best natural SP pools in the game, and you will need it! Your healing abilities are based on your magic attack substat, so coupled with increasing your SP, makes it the most important stat for FS priests to invest in. 100 total intelligence points provides immunity to silence. Some priests may go for the highest INT possible for the largest SP pool, while others may opt for a more balanced build to aid in survivability.
DEX:
This is the major stat that reduces variable cast times. INT reduces cast time at about half the efficiency of DEX. The formula is as follows: DEX * 2 + INT = 530, where all variable cast time is reduced to nothing assuming you can somehow meet 530. A far more detailed explanation can be found here: http://irowiki.org/w...kills#Cast_Time
LUK:
Luck in Renewal now gives a bit of every substat, most optimally in multiples of 30. 100 LUK provides immunity to Curse. It is a good quaternary stat to invest in, as magic attack and a few status resistances can be increased somewhat with luck. Recommend minimum 77 base luck to eventually use an Arc Angeling card.
A tip from kasshin: "One personal tip of mine, while I was building a third AB for leveling: since I have an Arc Angeling Card, for this AB, I did something along the lines of 90 INT, 60 VIT, 30 DEX, and I started going for 77 LUK first before going for other stats like higher VIT. This allowed me to get 77 LUK very early (as a low lvl AB or even a high priest) so that I can I can enjoy the SP bonus as early as possible. I wear a lot of reduction gears so that even with lower VIT and HP, I was mostly fine, provided the monsters do not stun."
3. Example builds: (#BUILD)
Read the further sections to understand the skills.
Use these to help in planning your stats:
http://calc.irowiki.org/
http://irowiki.org/~himeyasha/skill4/
As a non-transcendent priest, begin with:
Max Intelligence before anything else.
Add a large amount of VIT (At least 70-80)
Then you can work on DEX or LUK as you please, but personally I added at least 90 before working on DEX.
These stats will serve you well until you rebirth into a transcendent character.
(Your character is not a transcendent character if they have not rebirthed. A new character is not transcendent until they rebirth @ level 99/50)
Skill build: Non-transcendent priest (Syriti):
http://irowiki.org/~...XdAhEbajN1qEJ1k
These are the personal stats and skill builds used by me and my guild members:

From left to right: Chocolate Milk, Syriti (that's me!), Bearer of Light, (Two) Noihara Himari
3.1 Syriti, Full Support PvM:
Stat build order (I added stats fully into their planned caps before moving on in build order, except that I left INT at base 99 or 100 until everything else was added. This is because adding base stats after 100 costs a huge amount of stat points.):
INT > VIT > DEX > LUK > STR > AGI
Why VIT before DEX?
STR: 2
AGI: 1
VIT: 109
INT: 110
DEX: 94 (+6)
LUK: 77 (+0)
0 stat points remaining.
Skill build:
http://irowiki.org/~...abkfqsrCgSgAIn1
Skill build order:
3.2 Bearer of Light, Full Support PvM:
STR: 1
AGI: 1
VIT: 110
INT: 101
DEX: 105
LUK: 77
0 stat points remaining.
Skill build:
http://irowiki.org/~...abkbqsECgSgAIn1
3.3 Chocolate Milk, FS War of Emperium:
STR: 30
AGI: 1
VIT: 105
INT: 107
DEX: 99
LUK: 77
1 stat point remaining. (He is waiting for the level 160 update)
Skill build:
http://irowiki.org/~...abkfqsrChfdnIn1
3.4 Noihara Himari, FS WoE/PvM hybrid:
STR: 10
AGI: 36
VIT: 105
INT: 107
DEX: 94
LUK: 78
0 stat points remaining.
Skill build:
http://irowiki.org/~...BabkfdsrEnS1In1
4. Skill Descriptions: (#DESC)
The skills will be organized by class tier and as (Skill Name) (Skill type) (Skill points to master).
The Skill types are:
Active: Skills used against a hostile target.
Recovery: Skills used to recover damage from allies.
Supportive: Skills used to strengthen a target.
Utility: Skills used for a variety of purposes, which do not fit the other skill classes.
Defensive: Skills that neutralize or prevent damage.
Passive: Skills that are always in effect once acquired.
There are some skills with a type unique to them and/or have two types.
4.1 Acolyte: (#ACO) Heal (Recovery) (10):
The staple of the acolyte-type classes. The effect is simple- point and click and the target will be healed based on the skill level used and the caster's magic attack. It has a one second skill delay. Costs 10+(3 * skill level) SP per cast, or 40 at level 10. You can't cast Heal on players wearing an undead armor outside of PvP. All healing skills can be used to damage undead players and monsters. This skill can heal barricades in WoE with shift-clicking. It is greatly more important to prioritize healing over buffs. Blessing (Supportive) (10):
At level 10, the target receives STR, INT, DEX +10 for four minutes. Costs 64 SP at level 10. When cast on undead or demon monsters, inflicts chaos. Blessing cures curse and the HIT reduction from blind (by forcing the game to recalculate your HIT due to changing your DEX) at any skill level. Cannot be overwritten by a lower level Blessing. This is one of your most important buff skills and you should try to maintain it on party members. Increase Agility (Supportive) (10):
At level 10, the target receives AGI + 12 for four minutes. Gives a 25% movement speed bonus regardless of level. Cannot be overwritten by a lower level Increase Agility. Costs 15 HP and 40sp per cast. Counters and is countered by Decrease AGI and Quagmire. This is another main buff skill you should try to maintain. Divine Protection (Passive) (10):
Provides +3 hard defense against demons and undead per level. A mediocre skill, but 5 points in it is a prerequisite for Blessing. Cure (Recovery) (1):
Instantly recovers the target from: Silence, Blind, Chaos. You should have this regardless of build. Ruwach (Active) (1):
Reveals and (weakly) damages hidden targets. Allies can be revealed but not damaged by Ruwach. Lasts 10 seconds and creates an un-hide radius around you. Some invisibility-type skills are immune to being revealed like the Stalker's Stealth. In PvP/WoE situations, do not hunt thief-types alone with this because they'll just kill you after being revealed. Teleport (Utility) (2):
At level 1, you can move to a random spot on the current map your character is on. At level 2, you can return to your save point. Fly wings emulate the effect of Teleport 1, and Butterfly Wings emulate the effect of Teleport 2. The item versions have an instant effect, therefore no need to select usage level on cast. It may be useful to hotkey them due to this. You can also use the up and down arrow keys and enter to select your usage type when casting Teleport. Teleport is disabled on a small number of maps. (Indoor maps, WoE maps, and a few special maps such as Amatsu Dungeon floor 1.) Butterfly wings are still usable in these situations.
 Warp Portal (Utility) (4):
At level 1, you can create a portal that goes to your save point. Each level after that allows one more warp point of your choice. You can record your warp points with the /memo chat command. If 3 points are already memorized, the oldest one will be replaced. If a warp point already exists on the current map, it will simply change the target position to the new one. Dungeons and indoor areas cannot be memo'd and there is a limit of 8 characters warped per cast. This skill cannot be cast under a character and the caster leaving the map (by using the warp or walking out) causes it to close instantly. If the portal's target is on the same map as the caster, and the caster uses the portal, it will not disappear (because the character didn't leave the map). If multiple Warp Portals are cast on the same spot, the newest one takes priority. Up to three warp portals can be active from one caster at once. Costs 1 blue gemstone. Pneuma (Defensive) (1):
For 10 seconds, blocks all ranged non-magic damage in a 3x3 range around the target spot. Pneumas cannot overlap and cannot co-exist with Safety Wall. This is a somewhat situational skill but the effect is extremely powerful. It can shut down archer-type characters completely in PvP/WoE, and void the Biochemist's/Geneticist's Acid Bomb. The skill must be used with care because it can also block the ranged attacks of allies. It is sometimes key to surviving an MvP battle. Aqua Benedicta (Utility) (1):
Creates 1 Holy Water. The caster must be standing on actual water that exists in the environment or the sage skill Deluge or the skill will fail. Comodo is a good city to make Holy Water, since the shore is very close to the Kafra employee. Requires 1 Empty Bottle. You should have this regardless of build. Angelus (Supportive) (10):
Increases the party's soft defense by 5% per skill level. Lasts 30 seconds per skill level. Counters and is countered by Provoke. As soft defense is high for FS priests, this will potentially be one of your main party buffs. This skill is sometimes seen as useless by priests and opt instead for adding other skills instead improving survivability slightly with Angelus. Demon Bane (Passive) (10):
Bonus of +3 weapon mastery attack power against undeads and demons per skill level. It isn't useful to an FS priest. Signum Crusis (Active) (10):
Decreases the hard defense of all undead and demons on-screen. Higher skill level improves the % of defense decreased and success rate. This skill is too situational and the effect isn't worth it to put points into, especially when you already require 35 skill points for Heal, Blessing, and Increase Agility 10, and another 8 for Pneuma. Targets that are successfully hit by Signum Crusis will use the /swt emote. 
 Decrease AGI (Active) (10):
This skill does the opposite of Increase Agility. Counters and is countered by Increase Agility. Monsters are not affected by this much, but it is sometimes used in PvP or WoE to inflict a 25% move speed penalty.
 Holy Light (Active) (Quest Skill):
Attacks a target for 125% of your magic attack. Has a somewhat lengthy cast time (2 seconds) and low damage. You will not be using this skill much in PvM, but in WoE/PvP, it instantly destroys Kyrie Eleison.
Quest guide:

4.2 Priest: (#PRI) Magnificat (Supportive) (5):
Doubles the party's SP regeneration speed. Lasts 15+(15 * skill level) seconds, or 90 seconds at level 5. As the SP costs of Priest skills are high, you will want to maintain this 100% of the time. Status Recovery (Recovery) (1):
Instantly recovers the target from Stone Curse, Freeze, and Stun. It can also be used on aggressive monsters to make them re-acquire their target (however, this could be the old target) or make a passive monster stop attacking. Has a somewhat long skill delay (2-3 seconds?). This skill is a prerequisite for Resurrection. Increase SP Recovery (Passive) (10):
This skill increases the character's natural SP regeneration when standing still/sitting by a solid 3 per skill level whenever SP regeneration occurs. It also improves the power of SP restorative items by 2% per skill level. 4 points is a prerequisite for Resurrection. 5 points is needed for Meditation. Resurrection (Recovery) (4):
At level 4, instantly resurrect the target player at 80% of their maximum HP. With hope, you won't have to use this too often as EXP death penalties apply immediately on death. Can be used offensively to instantly kill non-boss undeads, and takes on the properties of Turn Undead when used to do so. Cannot be used on downed undead players. WoE priests may consider getting only 1 point in Resurrection, in order to add more points into other skills. This is due to downed players in WoE being removed from the map immediately upon death. Costs 1 blue gemstone. Sanctuary (Recovery) (10):
Creates a 5x5 heal square around the targetted space. Players or monsters that do not have full HP are healed once per second. There is a time limit and a heal limit for Sanctuary, it will disappear after either expires. Undead creatures or players (in PvP) take half of the healing as damage and consume 2 heals; however, madomechs can be healed by Sanctuary. The healing power of Sanctuary is determined by skill level and is unaffected by the caster's magic attack, but heal bonuses from equipment will apply. Sanctuary's Heal power maxes out at skill level 7. Priests may opt not to add Sanctuary after 7 for this reason. Skill levels after that will provide a minor increase in duration and heal limit. It's incredibly useful for allowing you to prioritize using Lex Aeterna in an MvP party. Recommended to cast after a party leader uses a Giant Flywing into a mob, and when the party stops moving to fight monsters. This is the most SP efficient (42sp to cast @ level 10) healing skill to heal multiple party members at once (but not the fastest!), and it remains useful well in the Arch Bishop stage. This skill can heal barricades in WoE. Costs 1 blue gemstone.
 Impositio Manus (Supportive) (5):
Increases the target's equipment attack by 5 per skill level. A mediocre but sometimes useful skill to use for levelling lowbies, its utility is hampered by a low duration. Also useful for applying to DPS classes like Rangers or Geneticists whenever you can find the time, as any attack gains for them are major. This skill is added to 3 as a prerequisite for Safety Wall. Aspersio (Utility) (5):
Enchants the target's weapon with the Holy element. The effect is lost if the target unequips the weapon. Duration improves with skill level. Safety Wall requires 4 points in this as a prerequisite. A priest should carry at least 30-40 Holy Waters as party members may request Aspersio. Weapon element enchants such as Aspersio or Sage Endow Element skills overwrite a weapon's natural element. Aspersio and Endows will overwrite each other! This means you can potentially accidentally erase a 20-30 minute element change that uses a much pricier catalyst. Requires 1 Holy Water. Safety Wall (Defensive) (10):
Creates a single space barrier on the chosen spot that blocks all short range physical damage. Blocks 2 + skill level hits. The skill has an HP limit, but the limit is quite high. Disappears after the hit limit or HP limit is met, whichever happens first. Higher skill levels have faster cast times; level 10 has a base 0.4s cast time. This is an incredibly useful skill, it allows the caster to create an instant 30k~ HP wall to save or buy time to heal an ally. This skill is only effective when the target has come to a complete stop, and fails if the target is being hitlocked while attempting to move (due to position glitching). The target must also re-adjust their position in order to not be 'in-between' spaces. This skill cannot coexist with Pneuma. It can be used offensively on MvPs to prevent them from casting Pneuma. I personally like to use Safety Wall on Fiber Locked party members, as they aren't going anywhere for a few seconds and I'd like to save the SP I'd use healing them. Costs 1 blue gemstone.

How to target Safety Wall so you don't miss and kill your allies (Aim for their feet/just above the HP bar). Lex Divina (Active) (10):
Attempts to silence a target. The skill lasts (25 + (5 * skill level) seconds, up to a maximum of 60 seconds. Ineffective on MvPs. Casting Lex Divina on a silenced target will always remove silence. You can cure silence on party members by shift-clicking them with Lex Divina, but Cure is faster because it doesn't have a skill delay. Silence can also be stat resisted by having 100 base INT when cast on an enemy player. 5 points are added to this as a prerequisite for Lex Aeterna. Lex Aeterna (Active) (1):
Causes the target to take double damage from the next damage source. If received damage is from a skill that inflicts multiple hits in a combo, this skill instead multiplies the end damage of that skill by 2. This is a critical skill to use for MvP parties to allow the Geneticist(s) to inflict massively more damage with Acid Bomb. Has a lengthy skill delay of three seconds, but is practically nothing inside of Magic Strings.
- This skill will only increase the damage of the first half of Bowling Bash (because it is two hits in one!)
- This skill will only increase the damage of the first quarter of Lord of Vermilion (because it is 4 separate combo hits in one cast!)
 Kyrie Eleison (Supportive/Defensive) (10):
Creates a physical attack barrier around the target that is equal to 10+(2 * skill level)% of the target's HP. Also has a hit limit of 2+skill level. The shield disappears after either the HP or hit limit expires. Attacks that miss the character do not apply to the HP or hit limit, but will still show the 'barrier' animation. Players will not see the barrier animation on other characters, they will instead see 'miss'. This is a much more mobile but weaker defensive skill than Safety Wall, but I personally prefer to use Praefatio. Kyrie Eleison can be used to prevent hitlock, particularly when you or another person lags behind a party and is being attacked by monsters spawning from behind. 2 minute duration. Is very useful in WoE. One point is a prerequisite for the Arch Bishop's Praefatio. Kyrie Eleison will overwrite Assumptio. Turn Undead (Active) (10):
This skill allows the priest to instantly kill non-boss undeads. Will cause minor damage on failure. Higher level improves success rate. One point is required for Judex and 3 points are required for Magnus Excorcismus. Magnus Excorcismus (Active) (10):
Creates a 7x7 area that causes heavy damage to undead and demons that enter it (and players wearing undead armor in PvP). Monsters are hit skill level number of times. If they are still standing in it after 3 seconds, they receive another hit combo from ME. This spell has a lengthy base cast time of 15 seconds so a large amount of DEX is needed to use it feasibly. As an FS priest, damage will not be your priority and thus we do not get this skill. Costs 1 blue gemstone. Suffragium (Supportive) (3):
Reduces the variable skill cast time of the next skill used by the target by (15 * skill level)%. Lasts 40 minus (10 * skill level) seconds. Suffragium is removed immediately after the target's next skill use, regardless of whether or not the skill had cast time. As Suffragium affects variable cast time, it stacks with Sacrament. This skill is not useful in practice as a priest will constantly be casting heals or buffs, it cannot be cast on yourself and Sacrament is better. Slow Poison (lololol) (4):
Don't get this skill. Ever. (Recovers from the HP loss caused by poison, but all the other effects of poison such as reduced VIT DEF still apply; in addition, the Thief's Detoxify is a superior skill. It cures all effects of poison and costs 1 first job point!) Gloria (Supportive) (5):
Gives all party members +30 LUK for the skill duration. Lasts 5 + (5 * skill level) seconds. This short duration means that Gloria will have to be refreshed constantly. This high LUK gain means that allies gain a plethora of minor bonuses, notably 3 Perfect Dodge. Is a critical skill for MvP'ing with a ranger, as they will need LUK to help in hitlocking the boss. While it isn't a bad skill, there's simply no room for it on my build. Helpful in resisting the Geneticist's Mandragora Howling skill. This is a main buff skill for potion making parties, as INT, DEX, and LUK give bonuses to success rate for the creator. Mace Mastery (Passive/Mastery) (10):
Gives +3 weapon mastery attack power with maces per level. Equipment attack gained from weapon mastery always pierces defense. You shouldn't even have a mace equipped, and should be favoring rods for the magic attack boost (unless you're a battle priest). Benedicto Sanctissimi Sacramenti (Utility) (5):
This skill enchants anyone's armor within a 3x3 radius around the caster with Holy 1. The skill persists even if armor is unequipped, which can render elemental armors useless. The caster must be standing next to two acolyte-type characters, side-by-side, to cast the skill. This condition makes the skill vastly too situational in PvM to use practically. Lasts for 40 * skill level seconds. It is useful in WoE when comboed with casting Aspersio on enemies.
 Redemptio (Recovery) (Quest Skill):
Sets the caster's HP to 1 and lose 1% EXP. Ressurects all fallen party members at 50% HP. Lose 0.2% less EXP per member revived. The skill will fail and no HP or EXP loss will occur if there are no downed party members to revive.
Quest guide:

4.3 High Priest: (#HP)
(The High Priest has comparatively little skills because they have the same skills as priests with these extra skills and an expanded job level cap of 70.)
 Meditation (Passive) (10):
Each point in Meditation provides +2% Heal power, +1% maxSP, and +3% SP recovery. At level 10, Meditation provides +20% Heal power, +10% maxSP, and +30% SP recovery (Natural regeneration and SP recovery items). This is a critical skill to have as it applies a large number of bonuses. Priests will need every single point of SP they can get. Assumptio (Supportive/Defensive) (5):
Doubles the target's defense. Higher levels of Assumptio gives a longer spell duration. Lasts skill level * 20 seconds. This is best used on high DEF targets like swordsman-types or monks with Mental Strength active. Assumptio is disabled in WoE. Assumptio will overwrite Kyrie Eleison. Basilica (Defensive/Area Denial) (5):
Creates a 5x5 perfect defense zone around the caster. Attacks may not go in or come out, skill use is disabled while inside and hostiles are barred from entry. While this sounds good in theory, there are too many restrictions on the skill that renders it useless. If any monster exists within 5x5 spaces around the caster, the initial skill cast will fail. If there is some sort of obstacle that blocks the 5x5 spaces, the skill will fail. The skill is also disabled in WoE and does not work against boss monsters. The caster cannot move or use any other skills while maintaining Basilica. The caster cannot self-terminate Basilica. These difficult cast and usage conditions coupled with the inability to use it against MvPs or in WoE, and requiring 1 blue, red, and yellow gemstone and a holy water makes Basilica a useless skill. Spiritual Thrift (Passive) (5):
Reduces the character's SP consumption for all skills by 4% per level. This skill is meant for battle priests, as you require level 10 Mace Mastery and Demon Bane as prerequisites.
4.4 Arch Bishop: (#AB) Coluseo Heal (Recovery) (3):
Casts the highest learned level of Heal on all party members in a radius around the caster. The recovery is slightly more powerful than a normal Heal. More skill points increases the radius from 3 to 7 to 15 spaces around the caster. Has a cost of 240SP at level 3. When Coluseo Heal is cast, any character who cannot receive Heals (Madogear Mechanic or player wearing an Undead armor) will block Coluseo Heals for the rest of the party after the mado's/undead's name in the party window. This is currently a bug with the skill and you should kick mados/undeads and re-invite them to put them on the bottom of the roster. Can be used to heal allies around corners, as the lack of a direct 'line of sight' will block Heal use. It is a more mobile skill compared to Sanctuary, but do not use Coluseo Heal to heal one person, it's an utter waste of SP.
 Clementia (Supportive) (3):
Casts the highest learned level of Blessing (which is hopefully 10) on all party members around the caster. More skill points increases the radius from 3 to 7 to 15 spaces around the caster. Every 10 job levels will give an extra +1 STR, INT, and DEX. Costs 360sp at level 3. Cantocandidus (Supportive) (3):
Casts the highest learned level of Increase Agility (which is hopefully 10) on all party members around the caster. More skill points increases the radius from 3 to 7 to 15 spaces around the caster. Every 10 job levels will give an extra +1 AGI. Costs 240sp at level 3. Renovatio (Recovery/Supportive) (1):
Target recovers 3% HP every 5 seconds. Skill lasts 90 seconds. Inflicts damage over time on undead. Best used on high HP classes and tanks such as swordsman-types and monks. This skill can heal barricades in WoE with shift-clicking. Costs 70sp. High Heal (Recovery) (5):
Target recovers Heal * (1.7 + 0.3 * skill level) HP. Has a short cooldown when used. Costs 40 + (30 * skill level) SP. This skill can heal barricades in WoE with shift-clicking. Despite the heavy SP cost compared to using normal Heals, it is much faster than casting regular Heals with a 1 second delay. Ancilla (Utility) (1):
Pay 30% SP and 1 blue gemstone to create 1 Ancilla. Using an Ancilla recovers 15% SP. Carry limit of 3. Epiclesis (Recovery) (5):
Creates a 5x5 tree of life around the target space. Revives dead players with 50% HP on initial creation. Players near the tree will regenerate HP/SP (This means it can be used to accelerate an SP break if your party lacks a sorcerer) and receive a bonus to their max HP for a short time. This HP bonus improves the power of the Rune Knight's Dragon Breath skill. Can be stacked with Sanctuary. Reveals hidden players inside of it every 5 seconds. Requires 1 Holy Water, and 1 Ancilla. Praefatio (Supportive/Defensive) (10):
Casts Kyrie Eleison on all party members. Is not affected by the caster's learned level of Kyrie Eleison. Prafatio will always provide a 30% HP shield (equal to level 10 KE) and blocks 6 + skill level hits. Adds an additional +2% HP to the shield per party member. Has lower cooldown at lower skill level. This means you can opt not to add in Praefatio until it's time to get Sacrament, as Oratio and Expiatio are not critically important to have asap. Sometimes you may want to use Praefatio over Sanctuary after a Gwing. Has a lengthy cooldown and lasts 2 minutes. Oratio (Active) (10):
Reduces the Holy resistance of enemies in a 31 x 31 radius by (2 * skill level)%. Success rate is 40 + (5 * skill level))%. The skill is calculated for each individual enemy, and afflicted targets will be marked for 30 seconds. This mark will allow you to detect hidden enemies as well. This skill pierces walls and obstacles. Duple Light (Supportive/Self Only) (10):
Gives the caster a chance to inflict an extra 100 + (10 * skill level)% physical or 200 + (20 * skill level)% magic damage when melee auto-attacking. This is the heart of battle priest builds. You'll have to get 5 points in it anyway for Sacrament. Expiatio (Supportive) (5):
Target ignores 5% of enemy's defense per skill level. 1 point is a prerequisite for Sacrament. Sacrament (Supportive) (5):
Reduces target's fixed cast time by 10% per skill level. This means a 50% fixed spell time reduction for all skills. Maintain it on yourself, all caster-type classes, Suras using Mental Strength, Royal Guards using Sacrifice, Rune Knights using Dragon Breath (pretty much all of them), Geneticists for Acid Bomb when fighting MvPs, and occasionally on rangers who are maintaining Wind Walker and Fear Breeze. Lasts 30 + (30 *skill level) seconds. Lauda Agnus (Recovery) (4):
Restores the party of Stone Curse, Freeze, Stun, Freezing, Crystallization, and Burning status effects. Is useful against NPC WIDESTATUS skills that MvPs often cast. Provides a bonus of 4 + skill level VIT points on healthy members. Has a 50 + (10 * skill level)% success rate. Lauda Ramus (Recovery) (4):
Restores the party of Silence, Chaos, and Blind, Howling, and Deep Sleep status effects. Is useful against NPC WIDESTATUS skills that MvPs often cast. Provides bonus of 4 + skill level LUK points on healthy members. Has a 50 + (10 * skill level)% success rate. Clearance (Utility) (5):
Has a 60 + (8 * skill level)% chance to clear the target of most buffs and debuffs, except some third class abilities. Food bonuses (Such as Primo d'Buffer buffs from Eden Group) are not removed. Useful for removing Bleed. Has a long cooldown. Silentium (Active) (5):
Casts the highest learned level of Lex Divina in a radius around you. Has a 9x9 radius at level 1, 11x11 at level 2, and so on. Ineffective against MvPs. Some builds may opt to skip the entire Lauda skill line to get Adoramus. This skill pierces walls and obstacles. Has a long cooldown. Eucharistica (Passive) (10):
Gives the character 1% defense and attack increase per level against demon race monsters and shadow element attacks per level. This skill stacks with all other demon and shadow resistances the character may have. I think it isn't useful to get because it requires the same prerequisites as Sacrament, and by that point, there are still better skills to invest in (Silentium skill line). Judex (Active) (5):
Inflicts 300 + (20 * skill level)% magic attack damage on a target and all enemies in a 3x3 space around it. It is incredibly weak damage-wise compared to the skills used by other third class jobs. Adoramus (Active) (10):
Inflicts 500 + (100 * skill level)% damage to a single target. It is impossible to fit Sacrament and Silentium with Adoramus, so this skill (and its prerequisite, Judex) is dropped in favor of more Supportive skills in FS builds. Some builds may skip the entire Lauda skill line in order to gain a bit of fighting power by creating an Adoramus + Sacrament build. Costs 1 blue gemstone.
Open Auditorium (Supportive/Self Only) (5):
Increases the caster's healing power by (30 * skill level)% and the caster's SP consumption by (200 + (20 * skill level))%. This skill will disable the effect of Magnificat, if both exist on the caster. Not yet implemented on iRO.
Full Throttle (Supportive/Self Only) (5):
This skill is kind of like a mini-Frenzy. Fully recovers the user's health and gives them +20% stats for the duration and increased movement speed. Lasts 5 + (5* skill level) seconds. The user also loses (6 - skill level)% HP per second while it is active. You'll receive a debuff where your natural HP/SP regeneration is 0 and reduced movement speed for a time when Full Throttle expires. This skill is common to all third class characters. Not implemented yet on iRO.
(#KTHXBAI)
The purpose of this guide was simply to teach usage mechanics and details about priest skills that may not be readily apparent, and to hopefully increase the skill level of priests who read it. It is mostly written from personal experience and somewhat number-checked against iRO wiki (there are inaccuracies on there too). I have tested most but not all skills. Please PM, post here, or find me in-game for any inaccuracies you may have found and I will take them into consideration.
Try to guess where all the screenshots were taken!(Yeah this is a lame joke)*crosses fingers for a sticky*
pls explain how do heal 
(#CHNG)
12:33AM server time, June 17/14
-> Stealth edit! Changed my stats build
-> Yesh I'm alive
-> Might have a gear section coming in!
8:21PM server time, September 3/13
-> Added skill icons
-> Added hotkeys note
-> noted that top warp portal in a stack of warps takes priority
-> noted WoE priests may consider res 1
-> Added assumptio's duration
-> Added that you can't self-cancel Basilica
-> noted Gloria helps resist Mandragora Howling
-> noted that KE1 is a prerequisite for Praef
-> noted effects of L. Aeterna in regards to LoV and BB
-> Added rangers to potential targets for Sacrament
* edits for readability
+ rewrite introduction in the future?
+ Make note on job bonus?
Edited by Haweh, 16 June 2014 - 10:35 PM.


 awesomenesh Arrons