
 This topic is locked
PvM Guide for Warlock
Disclaimer: The opinions stated in this guide are of my own and what I followed to level to 150. Feel free to post additions/comments to this! Formulas for warlock skills are taken from Balance Patch Notes - https://docs.google....bZrdM7IcbfcVR9U
Last Updated: March 2014
Changelog
Dec 2013 - Added Alchemy Glove, adds +10% damage with Crimson Rock/Fire Spells.
Mar 2014 - Still relevant content due to lack of updates, fixed up a couple of formatting issues as well as Scaraba Card as the best accessory card for now (excluding MvP cards) and added clarification to cast time.
Table of Contents
1.0 tl;dr Skill Builds
1.1 Introduction
1.2 High Wizard and Wizard Skills
1.3 Main Warlock Skills used in PvM
1.4 Other Warlock Skills rarely used in PvM
1.5 Skill Order for Warlock
1.6 Formulas/Misc.
1.7 Spellbooks
1.8 Leveling
1.9 Stats
2.0 Gears
2.1 Gameplay
Generic High Wizard builds
Fire Wall - http://irowiki.org/~...BeBekgKcA95cHcY
SP Recovery + Fire Ball - http://irowiki.org/~...cBeBekgKcA97db1
Generic Warlock builds, for those who are too lazy to read this whole wall of text.
Comet
Fire Wall - http://irowiki.org/~...qOqSaOebdonadb1
SP Recovery + Fire Ball - http://irowiki.org/~...qOqSaOebdonadb1
Tetra Vortex
Branches for Tetra Vortex
1. Fire Wall or SP Recovery + Fire Ball?
2. Radius or Crimson Rock?
3. Recognized Spell or the above?
Some possible builds are:
http://irowiki.org/~...FaFqSrbaOab1db1 (Skipped Recognized Spell)
http://irowiki.org/~...faFqSrbebdo1db1 (Skipped Crimson Rock 5)
http://irowiki.org/~...FaFqSqBebdo1db1 (Skipped Radius 3)
1.1 - Introduction
Warlocks are one of the lesser played classes; however that shouldn't deter you from playing one of the most versatile classes in the game. With spells that can do decent amounts of damage and a variety of disabling skills as well as serve a role in WoE, whether it is support or offense, the warlock class shouldn't be looked over when considering a class to play.
1.2 - High Wizard and Wizard Skills
Fire Wall – Fire Wall is just generally good for keeping away monsters from your character or party members, and it can also be used to group together mobs moving at different speeds for Crimson Rock/Other Skills.
http://irowiki.org/wiki/Fire_Wall
Safety Wall – In terms of solo and party usage, this helps extremely with survival. Safety Wall depends on a number of hits or damage cap, meaning that if a certain amount of damage or a certain number of hits exceeds the capability of Safety Wall, it will disappear. It can withstand a minimum of 1 hit, and will apply to anything on the cell containing Safety Wall. Use this skill to rescue party members + yourself.
http://irowiki.org/wiki/Safety_Wall
Mystical Amplification – Makes your skill do (0.05 x Mystical Amplification Level)% more damage. Very useful obviously for damage output, since it increases the damage of your magic. Note that this skill doesn’t work with release, but using a Mystical Amplification Scroll after using release will give this damage effect on the released spell. Use a Staff of Destruction for the fastest cast with this skill since it gives -50% cast time on Mystical Amplification.
http://irowiki.org/w...l_Amplification
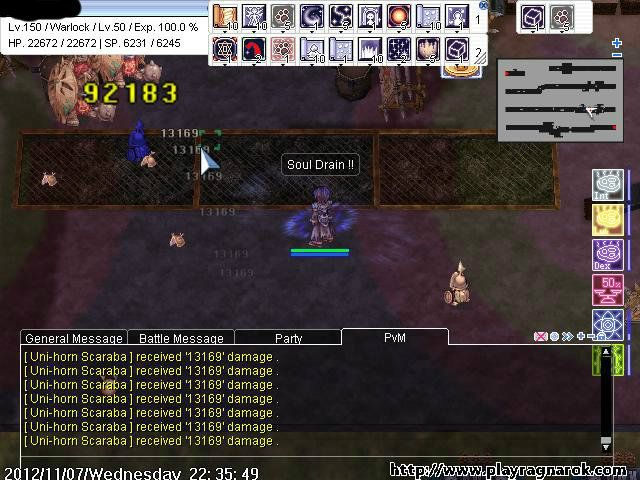
Soul Drain – Best skill in usage with single target skills - it takes SP from the monster when the monster dies to certain spells that you cast. Although Crimson Rock doesn’t seem like a single target skill, it will work with this skill, which helps out with your SP. As well it will work with other skills like Chain Lightning, Tetra Vortex, Fire Bolt, etc. Just by having this, you also increase your max SP by 20%.
http://irowiki.org/wiki/Soul_Drain
Frost Nova – Let’s say you’re getting mobbed. Any monster that doesn’t have freeze immunity from higher level will be frozen if you spam this skill even if they are of water element. Frozen monsters = can’t attack you, so you’ll have a chance to do whatever you need, such as using Mystical Amplification and casting Chain Lightning. Note the cast times for Frost Nova on the wiki are wrong.
http://irowiki.org/wiki/Frost_Nova
Quagmire – Lowers your enemies’ AGI and DEX as well as ASPD and movement speed. It may not seem like much, but having monsters slower and attacking slower may save your life or your party member’s. Just don’t forget that you can only have 3 Quagmires up at a time and that the duration depends on the skill level.
http://irowiki.org/wiki/Quagmire
Storm Gust – Useful in conjunction with Reading Spellbook + Release. But otherwise, doesn’t have that much use unless used at level 1, where it’ll knock around enemies and potentially freeze them.
http://irowiki.org/wiki/Storm_Gust
As well, you should have all the requirements for Warlock Skills (Meteor Storm, Lord of Vermillion)
So your high wizard skill build can look like this: http://irowiki.org/~...BeBekgKcA95cHcY or http://irowiki.org/~...cBeBekgKcA97db1
1.3 Main Warlock Skills used in PvM
Reading Spellbook – You can go buy spellbooks from the NPC inside the mage guild in Geffen – with this, you can read spellbooks and release them with Release 1, meaning that you can instant cast spells that you have read. Remember, you can only store a limited amount of spells and that they will be released in the order read. As well, you cannot store any spell you haven’t learned. When you read a spell, you will use the SP needed to cast the spell normally.
Fixed Cast Time: 1 second
Variable Cast Time: 5 seconds
Global Skill Delay: 0.5 second
Release – Allows you to release any stored spell, one at a time. There is currently a 2 second delay on this skill, but it bypasses any specific skill delay. This means that you can release 2 Comets, even though Comet casted by itself has a 1 minute delay. Take note though, once you’ve released Comet, you will still have a 1 minute cooldown on the spell. For leveling, I liked to store Crimson Rock or Storm Gust. It must be casted on a target, even for normally ground targeted spells like Comet.
Crimson Rock – This should be maxed after you’ve gotten Release 1 and Reading Spellbook 1. You target a single enemy, and then the mobs around the enemy as well as the enemy itself will be hit by a flaming rock that does damage. They have a chance to get stunned if you are of higher level and they don’t have stun immunity. A common combination is freezing mobs with Frost Nova or Jack Frost, and then using Crimson Rock on the frozen targets as water 1 still takes 90% from fire.
Fixed Cast Time: 2 seconds
Variable Cast Time: 5 seconds
Skill re-use Delay: 5 seconds
Global Skill Delay: 2 seconds
AoE: 7x7
Stun chance: 40%
MATK [{( Skill Level x 300 ) x ( Caster’s Base Level / 100 ) + 1300 }] %
Frost Misty – Requirement for Jack Frost, useful for sometimes inflicting freezing status, but the chance is very low now so best to leave this at level 2.
Fixed Cast Time: 0.5 second
Variable Cast Time: (1.5 + 0.5 * Skill Level)
Skill re-use Delay: 4 seconds
Global Skill Delay: 1 second
AoE: 19x19
Freezing chance: (25 + 5 * Skill Level) %
MATK [{( Skill Level x 100 ) + 200 } x ( Caster’s Base Level / 100 )] %
Freezing duration: 6 second Fixed + [ 7 second - { (Target’s VIT + DEX) / 20} second]
(Lasts minimum of 6 second)
Freezing status effect: - 50% movement speed / - 15% attack speed / + 15% Variable Cast Time, - 10% DEF.
Jack Frost – An AoE that spreads out from you, at 100% freezes anything that you can freeze. Since it does crappy damage without the target having freezing status, and Frost Misty is nerfed for inflicting the freezing status, it’s not of great importance to max out this skill. I personally only used it for getting mobs frozen. Max this skill later if you’d like – increasing its levels gets bigger AoE and cast time as well as a damage increase.
Fixed Cast Time: 1 second
Variable Cast Time: (1.5 + 0.5 * Skill Level) seconds
Global Skill Delay: 1 second
AoE: Level 1: 11x11
Level 2: 13x13
Level 3: 15x15
Level 4: 17x17
Level 5: 19x19
This skill will always inflict Frozen status at 100% chance.
(Targets not in Freezing status)
= MATK [{( Skill Level x 100 ) + 500 )} x ( Caster’s Base Level / 150 )] %
(Targets in Freezing status)
= MATK [{( Skill Level x 300 ) + 1000 )} x ( Caster’s Base Level / 100 )] %
White Imprison – Usually used as a self-preservation skill in PvM. If the monster attacking you doesn’t have a ghost element attack and doesn’t know dispel, it will hit you for zero damage during the time you are in White Imprison. Spam it on yourself with Shift+Click, usually with this skill you can tank an insane number of mobs considering they don’t have any of the skills above. This skill can be broken with Status Recovery.
Skill re-use Delay: 4 seconds
Duration: On Monsters, 15 second - {[Monster’s VIT + LUK] / 20} = duration
Global Skill Delay: None
Success Chance: On self, 100%
On Monsters, (40 + 10 * Skill Level) %
White imprison can only be used to imprison (White Imprison Skill Level) targets at a time.
Recognized Spell – One of the best skills for leveling, it will remove variance from your damage and only take the highest output. For instance, if your Crimson Rock does 10,000 to 20,000 damage, if this self-buff is on, your Crimson Rocks will always do around 20,000 damage. Only downside is that during this skill on you, your skills will all take 2x more SP. Higher levels will increase the time that it’s on for as well as increasing the cooldown.
Fixed Cast Time: 1 second
Variable Cast Time: 1 second
Skill re-use Delay: (20 + 30 * Skill Level) seconds
Global Skill Delay: 1 second
Duration: (30 + 30 * Skill Level) seconds
Chain Lightning – Use in Magic Strings for a lot of damage output. It bounces from enemy to enemy, doing less each bounce for a maximum of 9 bounces at level 5. If this skill is used with Mystical Amplification, it will only do the 1.5x damage on the first hit. On a single target, it will bounce 3 times. It works with Soul Drain and is usually casted on a frozen target for more damage.
Fixed Cast Time: 1 second
Variable Cast Time: (3 + 0.5 * Skill Level) seconds
Skill re-use Delay: None
Global Skill Delay: 3 seconds
Number of chains: (4 + 1 * Skill Level)
MATK [{( Skill Level x 100 ) + 500 } x ( Caster’s Base Level / 100 )] %
Every time it bounces, damage will increase by + MATK [100 x (9 - Total bounces)] %
After damaging the primary target, if there is another enemy within 5x5 range, it will bounce to the other target.
After 2 bounces, it will bounce to other targets in 7x7 range.
Comet – A lot of SP usage, a long cast time. If you can get yourself a Comet spellbook, and release this skill with Recognized Spell on, it will do a decent amount of damage in a huge AoE. The further from the center the target hit is, the less damage it will do. Ground targeted skill. As well, this skill will do more damage with another warlock in a 7x7 range of you. This skill costs 2 Red Gemstones to cast.
Fixed Cast Time: (0.5 + 0.5 * Skill Level) seconds
Variable Cast Time: (9 + 1 * Skill Level) seconds
Skill re-use Delay: 60 seconds
Global Skill Delay: 2 seconds
AoE: 19x19
Burning Chance: 100%
Burning duration: 15 seconds
Earth Strain – Very long normal cooldown, not very useful in my opinion for leveling but more for a Release type of spell. Having a couple stored and released can do a decent amount of damage, the AoE is targeted on the ground and moves forward a number of cells, depending on its level and does damage to anything in its way. Good for wind element mobs obviously like Blue Acidus.
Fixed Cast Time: 2 seconds
Variable Cast Time: (1 + 1 * Skill Level) seconds
Skill re-use Delay: 10 seconds
Global Skill Delay: 1 second
MATK [{( Skill Level x 100 ) + 2000 } x ( Caster’s Base Level / 100 )] %
AoE: Level 1: 15 x 5
Level 2: 15 x 6
Level 3: 15 x 7
Level 4: 15 x 8
Level 5: 15 x 9
Soul Expansion – A quick finisher skill that’s useful for killing mobs that have already been damaged. Requirement for Recognized Spell.
Variable Cast Time: 2 seconds
Global Skill Delay: 0.5 second
AoE: Level 1 ~ 3: 3x3
Level 4 ~ 5: 5x5
MATK [{( Skill Level + 4 ) x 100 ) + ( Caster’s INT )} x ( Caster’s Base Level / 100 )] %
Deals twice the amount of damage on White Imprisoned targets
Radius – Skill level depends. Are you going to be partying to level? Then leave this at level 1. Are you going to be soloing with an Arch Bishop slave that can give you Sacrament? Then max this skill. Note that this is currently a passive skill, not active as the patch notes suggest.
Bonus Cast range: (Skill Level) cell(s)
Fixed Cast reduction: [{(Caster’s INT / 15) + (Caster’s Base Level / 15) + (Radius Skill Level x 5)}]
1.4 Other Warlock Skills rarely used in PvM
Freezing Spell – This passive skill gives you more slots to store spells from Reading Spellbook.
Hell Inferno – Useless in most cases, Crimson Rock is better and this skill is only single target (not AoE). Only exceptions that this skill would be useful for are holy monsters and you rarely see those.
Fixed Cast Time: 1 second
Variable Cast Time: 3 seconds
Global Skill Delay: 1 second
Burning chance: (55 + 5 * Skill Level) %
(Shadow Element)
= MATK [{( Skill Level x 300 ) x ( Caster’s Base Level / 100 ) x 4/5 }] %
(Fire Element)
= MATK [{( Skill Level x 300 ) x ( Caster’s Base Level / 100 ) /5 }] %
Burning Status:
Deals 1000 + (Target’s MHP 3%) damage every 3 seconds.
Reduces the target’s MDEF by 25%.
15 second base duration, reducible by STAT. 5 second minimum duration.
Tetra Vortex – Single target skill, usually used in PvM for farming high tier monsters like Incarnation of Morroc. Potentially low tier MvP skill if you have the gears, but otherwise for MvPing Chain Lightning in Magic Strings is better damage output.
Fixed Cast Time: 2 seconds
Variable Cast Time: (4 + 1 * Skill Level) seconds
Skill re-use Delay: 15 seconds
Global Skill Delay: 2 seconds
Status effect chance: 100%
MATK (500 + 500 * Skill Level) % * 4
Marsh of Abyss – Good for disabling a single target, but most of the time it’s useless in PvM where the goal is usually to kill rather than disable exception maybe in Biolabs.
Fixed Cast Time: 0.5 second
Variable Cast Time: 2.5 seconds
Skill re-use Delay: None
Global Skill Delay: 1 second
Movement reduction: - (10 * Skill Level) %
AGI/DEX reduction on monsters: - (6 * Skill Level) %
Skill duration is: 5 second (Fixed) + 25 second - {( INT + LUK ) / 20 second }
(If this value is negative, set to 0)
Movement penalty can stack with other movement slowing effects such as Quagmire, however player’s movement speed cannot be brought below 50%.
Stasis – Do you want to get yourself/party killed? This disables most skills for a period of time relative to the skill level of the skill. It’s mostly useless in PvM.
Fixed Cast Time: 1 second
Variable Cast Time: 3 seconds
Skill re-use Delay: 5 minutes
Global Skill Delay: 2 seconds
AoE: Level 1: 19x19
Level 2: 21x21
Level 3: 23x23
Level 4: 25x25
Level 5: 27x27
Duration: 5 second (fixed) + { Stasis Skill level * 5 - (Target’s VIT + DEX) / 20 }
(If this value becomes negative, the duration is set to 0)
Drain Life – Doesn’t do a lot of damage, doesn’t give back a lot of HP, hence useless for PvM.
Fixed Cast Time: 1 second
Variable Cast Time: 4 seconds
Skill re-use Delay: 2 seconds
HP Leech: (5 + 5 * Skill Level) %
Success Chance: (70 + 5 * Skill Level) %
MATK [{( Skill Level x 200 ) + ( Caster’s INT ) } x ( Caster’s Base Level / 100 )] %
Sienna Execrete – It’s mostly useless because of the cost of 2 Red Gemstones per cast. If you're willing to use them though, go ahead. This spell is basically an AoE version of Stone Curse.
Variable Cast Time: 2 seconds
Global Skill Delay: 2 seconds
AoE: Level 1: 3x3
Level 2 ~ 3: 5x5
Level 4 ~ 5: 7x7
Success Chance: (45 + 5 * Skill Level) %
1.5 Skill Order and Skill Builds for Warlock
This is just what I'd recommend getting once you hit warlock:
Reading Spellbook 1 - For your initial levels, instant casting SG 10 with this and release makes it worthwhile getting
Release 1 - To release the stored spells from Reading Spellbook
Summon Fireball 1 - Prerequisite skill
Crimson Rock 5 - Main leveling skill
Summon Waterball 1 - Prerequisite skill
Frost Misty 2 - Prerequisite for Jack Frost
Jack Frost 1 - AoE to make enemies frozen
From here, you can go a couple of ways:
Option 1) Summon Lightning 1 > Chain Lightning 5
Option 2) Summon Stone 1 > Sienna Execrete 2 > Earth Strain 5
Option 3) Radius 1 > Drain Life 1 > Soul Expansion 3 > White Imprison 1 > Stasis 1 > Release 2 > Recognized Spell 1
You should take all three options, but the order is up to you. Personally, I'd recommend taking option 3 first.
Afterwards, you can dump the extra points anywhere you'd like.
1.6 Formulas/Misc.
Spellbook Formula: Slots = (4 * Freezing Spell Level) + floor(Base Level/10) + floor(INT/10)
floor means to round down.
MATK from your stats: floor(Base Level/4 + INT + INT/2 + DEX/5 + LUK/3)
http://irowiki.org/wiki/MATK
http://irowiki.org/wiki/Max_SP
http://irowiki.org/wiki/SP_Recovery
Fixed cast is irreducible by stats - and when modified by skills such as sacrament, it isn't addictive and instead chooses the larger reducing value; meaning that having radius and sacrament doesn't give you over 50% less fixed cast, it only gives you 50% less fixed cast.
Variable cast is reducible by stats - DEX and INT reduces it. Variable cast reductions from gears and stats do NOT stack additively!
Cast Time Formula: (1 − SQRT[(DEX × 2 + INT) ÷ 530)]) × [1 − Sum_CastReduc ÷ 100] × BaseVarCast + [1 − Max_FixReduc ÷ 100] × BaseFixCast
1.7 Spellbooks
http://irowiki.org/w...ading_Spellbook
Mage Books (aka Beginner's Spellbooks)
Cost: 10,000 Zeny, 2 Old Magic Books, or 50 Old Pages
Spell - Slots Needed
Cold Bolt - 7
Fire Bolt - 7
Lightning Bolt - 7
Thunderstorm - 9
Wizard Books (aka Intermediate Spellbooks)
Cost: 50,000 Zeny, 2 Old Blue Box, or 9 Elunium
Spell - Slots Needed
Earth Spike - 8
Heaven's Drive - 9
Jupitel Thunder - 9
Lord of Vermilion - 10
Meteor Storm - 10
Storm Gust - 10
Water Ball - 9
Warlock Books (aka Superior Spellbooks)
Cost: 12 Fragment and 100,000 Zeny, 7 Oridecon and 100,000 Zeny, or 1 Old Purple Box and 100,000 Zeny
Spell - Slots Needed
Chain Lightning - 12
Crimson Rock - 12
Drain Life - 8
Earth Strain - 12
Warlock Books (aka Ultimate Spellbooks)
Cost: 1,000,000 Zeny and obtainable through the Ultimate Spellbooks Quest
Spell - Slots Needed
Comet - 22
Tetra Vortex - 22
1.8 Leveling
I'm only going to be covering the 3rd class aspect of leveling here, I'll be listing recommended gears, skills, and setup. This is only for solo grind based leveling, not including the turn in maps since they're all different. I only mention potions here, just put carrots + Rudolf Hairband if you have one.
Setup
If you have a linker and it's married to you or it has been soul linked, get it to Kaahi you - this can reduce the number of pots needed. Buffs such as Sacrament, Blessing, Increase AGI are helpful. If you can afford it, have INT/VIT food on, HP increase potion (because warlocks have low HP), Medium LIfe Potion (Kafra Item, buyable with Eden Merit Badges) for less potting usage.
General Tips
Quagmire to slow down your enemies, Safety Wall to protect yourself, Fly Wing + Butterfly Wing for obvious reasons, Have Energy Coat on, Use Potions/Recovery Items, Have Recognized Spell up at all times, Having spells such as Crimson Rock or Storm Gust stored is also useful, Use Jack Frost/Frost Nova to freeze mobs.
Initial Job Levels
It's recommended that for the first couple of job levels as a 3rd class, you do the eden group quests upstairs on the 2nd floor near the stairs, since they each give a decent amount of exp.
Level 99~110
Kobolds
Map: http://rode-r.doddle.../view/ra_fild05
Directions: Just open your world map and find rachel field 5.
Recommended Gears: Cranial Shield (any shield carded with a Thara Frog Card), Pecopeco Hairband, Heal + Teleport Accessory, Phen Accessory OR Orlean's Gown.
Strategy: Mob a bunch of kobolds together, then, safety wall yourself with the cranial shield on. Then when the mobs come upon you, spam Frost Nova until they're mostly all frozen, switch to your staff, use Mystical Amplification and Crimson Rock. Another option is mobbing them, then releasing a Storm Gust and finishing off the leftovers with Jupitel Thunder/Other skill. Have energy coat up at all times if you can. The pecopeco hairband is for the increased movement speed so you can mob the monsters better. Heal and Teleport accessories are obvious, don't bother with healing if you can afford pots.
Nogg Road 2
Map: http://rode-r.doddle.../view/mag_dun02
Directions: From Juno, head one south then one east. Then from here, take the middle of the 3 portals on the left side of this map, and head to the top right corner once initially in Nogg Road 1.
Recommended Gears: Dragoon/Resistant Shield (any shield carded with a Sky Petite Card or Hodremlin Card), Fire Armor (Lucius or an armor with a Pasana Card on it), Heal + Teleport Accessory, Phen Accessory OR Orlean's Gown with Pasana Card.
Strategy: Usually Nogg is so mobby that you don't need to mob. Again, there are three ways to do this:
1) Release Storm Gust, pick off the strays with Crimson Rock/Other Skill.
2) Spam Frost Nova, then use Crimson Rock with Mystical Amplification or whatever.
3) Use Jack Frost, then Crimson Rock/Other Skill with Mystical Amplification.
Make sure until the enemies are all frozen (when using Frost Nova) that you keep your shield on, the mobs can easily overwhelm a squishy class like a warlock. Don't forget that you can make use of safety wall to protect yourself.
Ice Dungeon 2/3
Maps: http://rode-r.doddle.../view/ice_dun02, http://rode-r.doddle.../view/ice_dun03
Directions: From Rachel, head 1 East then 4 North. Then from here, take the middle portal of this map to get to the 2nd floor. From the 2nd floor, head to the very top portal for the 3rd floor.
Recommended Gears: Fire-Proof Shield (any shield carded with a Penomena Card), Water Armor (Saphien or an armor with a Swordfish Card on it), Heal + Teleport Accessory, Phen Accessory OR Orlean's Gown with Swordfish Card.
Strategy: Mob or pick out single targets (if using Jupitel Thunder), and use Chain Lightning or Jupitel Thunder. Watch out for the gazeti, they are ranged and can be quite annoying if attacking from off the screen.
Level 110~120
All the previous maps are still an option at this stage.
Juperos
Map: http://rode-r.doddle...view/juperos_01
Directions: Two south, One east from Juno. Center of the map.
Recommended Gears: Fire-Proof Shield (any shield carded with a Penomena Card), Heal + Teleport Accessory, Phen Accessory OR Orlean's Gown. Recommended to have 100 VIT total.
Strategy: This time, it's recommended that you use Frost Nova instead of the release Storm Gust you've perhaps done because of the water Venatu present on this map. Basically for this map, mob a bunch of Venatus, spam Frost Nova when they close in on you, Mystical Amplification and use Crimson Rock. This should be able to kill them all without any trouble if you have Recognized Spell by now. Just be careful that they do stun, so it's recommended that you're higher level than them or equal (Level 113) and have 100 total VIT. Ignore the Dimiks on this map, they're not worth killing.
Rachel Sanctuary
Maps: http://rode-r.doddle...s/view/ra_san01, http://rode-r.doddle...s/view/ra_san02
Directions: Two north of Rachel, then head upstairs and into the room with the gate. Quest needed to enter: http://irowiki.org/w...Sanctuary_Quest
Recommended Gears: Cranial Shield (any shield carded with a Thara Frog Card), Heal + Teleport Accessory, Wind Armor (Aebecee or armor with Dokebi Card), Phen Accessory OR Orlean's Gown with Dokebi Card. Glorious Suit, Glorious Muffler, Glorious Shoes.
Strategy: Probably the easiest map to solo, just watch out for the rare hodremlin. You can either
1) Mob, use Fire Wall to line them up and use Crimson Rock.
2) Mob, use Jack Frost then use Crimson Rock.
3) Mob, use Release Storm Gust then Crimson Rock.
4) Mob, Frost Nova spam > Crimson Rock.
Level 120~130
All the previous maps are still an option at this stage.
Cursed Monastery
Map: http://rode-r.doddle...ps/view/abbey02
Directions: One south of Veins, take the boat, then enter the Monastery. Then, head to the 2nd floor. Quest needed to enter: http://irowiki.org/w..._Entrance_Quest
Recommended Gears: Requiem Shield (any shield carded with a Teddy Bear Card), Heal + Teleport Accessory, Wind Armor (Aebecee or armor with Dokebi Card) so you don't instant die to a random Necromancer's Thunderstorm, Phen Accessory OR Orlean's Gown with Dokebi Card. Recommended that you have 100 VIT total.
Strategy: Challenging. Recommended that you have 100 VIT total and be Level 124+ because these zombie slaughters can stun you with their sonic blow. Keep your shield on and mob, use safety wall on yourself then Mystical Amplification, cast Crimson Rock and SWITCH TO YOUR WEAPON WHEN IT GOES OFF. After the spell damages the enemy, switch back to your shield. You can try using Fire Wall to get rid of any leftover health that they may have, If you see Fallen Bishop, just wing/teleport. Flame Skulls can be dispatched by being frozen, or just by soul expansion spam.
Bradium Golem
Map: http://rode-r.doddle...view/man_fild02
Directions: 2 East from New World Camp. New World Access needed
Recommended Gears: Fire-Proof Shield (any shield carded with a Penomena Card), Heal + Teleport Accessory, Phen Accessory OR Orlean's Gown. Recommended that you have 100 VIT total.
Strategy: Easier than Rachel Sanctuary. Just watching out for Centipedes and Tatachos, find a random Bradium Golem(s), Fire Wall, Mystical Amplification and Crimson Rock.
Level 130~150
Skarab Hall 2
Map: http://rode-r.doddle.../view/dic_dun02
Directions: 1 South and bottom right portal from El Dicastes. Then, head to the middle of the map and talk with the guards guarding the door. You'll be transported to Skarab Hall 2. Requires a quest to get in: http://irowiki.org/w...s_Secret_Orders
Recommended Gears: Gargantua Shield (any shield carded with a Bigfoot Card), Heal + Teleport Accessory, Phen Accessory OR Orlean's Gown. Recommended that you have 100 VIT total.
Strategy: There are a couple of ways you can do Scarabs, depending on your equipment, you can one shot Scarabs (Takes Empowered Crimson Staff) or two shot them.
1) Mob, then put down some Quagmires and Fire Wall, use Mystical Amplification, Crimson Rock. Then release Crimson Rock and they should all be dead if they haven't died yet.
2) Mob, put down Fire Wall, Release Crimson Rock two times and they should all be dead.
3) Mob, use Jack Frost/Released Storm Gust, Use Chain Lightning/Crimson Rock and repeat once more.
A note of caution, these monsters really hurt and can stun you, so make sure you're level 139+ if you don't want to get stunned. As well, get away from the MvP of this Map if you see it, Scarab Queen.
Somatology Laboratory 2
Map: http://rode-r.doddle.../view/lhz_dun02
Directions: Lighthalzen through the sewers in the slums. Head to the far right portal to get to the 2nd floor from the first floor of this place. Requires a quest: http://irowiki.org/w..._Entrance_Quest
Recommended Gears: Cranial Shield (any shield carded with a Thara Frog Card), Heal + Teleport Accessory, Phen Accessory OR Orlean's Gown with Angeling Card, Anti Arrow Accessory (accessory with Errende Ebecee Card). Recommended that you have 100 VIT total. Glorious Suit, Glorious Muffler, Glorious Shoes.
Strategy: Mob, use Jack Frost/Frost Nova or Release skills like Crimson Rock/Storm Gust/Earth Strain/Chain LIghtning, use Chain Lightning or Crimson Rock or Earth Strain with Mystical Amplification on frozen enemies if you decide to freeze them. The Anti Arrow Accessory is for the Kavach Icarus throughout the map. Watch out for the Eremes Guile in the map, it is Demon and can easily one shot you with a single random Soul Destroyer. As well, get away from the MvP of this Map if you see it, Egnigem Cenia (the regular one is fine).
Thor Volcano Dungeon 1 or 3
Map: http://rode-r.doddle...s/view/thor_v03
Directions: Head to http://rode-r.doddle.../view/ve_fild03, then go up to the portal. Going down 2 floors will get you to Floor 3, portals are found in the bottom right corners of the map.
Recommended Gears: Royal Guard Shield (any shield carded with an Alice Card), Heal + Teleport Accessory, Phen Accessory OR Orlean's Gown with Pasana Card, Fire Armor (Lucius or an armor with a Pasana Card on it), Anti Arrow Accessory (accessory with Errende Ebecee Card). Recommended that you have 100 VIT total.
Strategy: This is an unreasonable place in my opinion to level, but it's a possibility if you're determined to. In summation, basically just have Storm Gust stored and release it on a monster and hope that you don't get killed by the insane amount of damage these boss type monsters deal. The Anti Arrow Accessory is for the Bow Guardians throughout the map. Remember since these monsters are of boss protocol, they will not get frozen. As well, get away from the MvP of this Map if you see it, Ifrit.
1.9 Stats
By level 100 you may have something like this:
104 INT
84 DEX
46 VIT
By level 105:
109 INT
84 DEX
49 VIT
By level 110:
109 INT
84 DEX
65 VIT
By level 115:
109 INT
84 DEX
79 VIT
By level 120:
111 INT
84 DEX
87 VIT
By level 125:
112 INT
85 DEX
96 VIT
By level 130:
116 INT
85 DEX
96 VIT
By level 135:
120 INT
89 DEX
96 VIT
By level 140:
120 INT
94 DEX
96 VIT
28 LUK
By level 145:
120 INT
94 DEX
96 VIT
53 LUK
By level 150:
120 INT
94 DEX
96 VIT
71 LUK
Reason for these stats:
The low DEX at the beginning is because that I prefered damage output and survivability over casting maybe 0.3 seconds faster. Using cast reduction equipment like sprint ring as well as wearing Isilla carded headgear can help with the cast times. Why 120 INT? More MATK and spellbook slots as well as more SP. And considering that Crimson Rock has quite a cooldown as well as many other warlock skills, burst damage output is important. LUK is for the extra MATK. VIT is for an higher amount of HP, as well, 100 VIT gives you Stun Immunity if the monster is equal or lower level than you. In addition, VIT makes your recovery items heal for a lot more.
2.0 Gears
Upper Headgear
Crown of Deceit - Gives Cast Time reduction and more MATK as well as reducing some cast delay. Takes upper and mid. Put a Katherine Keyron Card or an Isilla Card.
Moon Rabbit Hat - Gives MATK. Card with Katherine Keyron or Isilla Card.
Skull Cap - Gives MATK on upgrade, less SP consumption when used with Elven Ears, when used with Thorn Staff of Darkness adds more MATK per upgrade on the staff + gives 10% cast reduction if the staff is +10. Card with Katherine Keyron or Isilla Card.
Ordinary Black Magician Hat - Gives increased Crimson Rock, Jack Frost, Earth Strain, and Chain Lightning damage by 5%, bypass the magic defense of normal monsters by 10%, upgrade increases magic defense bypass by an additional 2%, upgraded at +7 gives increased Crimson Rock, Jack Frost, Earth Strain, and Chain Lightning damage by an additional 5%, at +9 increases MATK by +5%. When used as set with Emblem of Elemental Destruction, gives increased Crimson Rock, Jack Frost, Earth Strain, and Chain Lightning damage by an additional 5% and increased SP regen by 25%.
Mid Headgear
Slotted Mid Headgear - Put an Isilla card into it for a chance for the -50% variable cast time buff. If you have a Rata card, put that in instead.
Black Devil's Mask - All Stats +2
Black Frame Glasses - Slotted, gives INT.
Robo Eye - Adds some DEX and MATK.
Lower Headgear
Ninja Scroll - Yay, +1% MATK
Umbala Spirit - +1% Max HP
Fish in Mouth - If you're using Fresh Fish as a recovery item, then you're obviously using this.
Armor
Set of Elemental Armors - The slotted versions of Aebeccus and Lucius are probably all you'll need for elemental armor. Can put Agav Card for more MATK.
Mora Robes (Aqua Robe, etc.) - These work as elemental armors as well, as well can give beneficial stats like more INT.
Orlean's Gown - Basically a Phen in an armor. Can put Agav Card for more MATK or cards such as Dokebi to make it an elemental armor.
Diabolus Robe - Greater heal, extra SP, reduces cast delay. Can put Agav Card for more MATK or cards such as Dokebi to make it an elemental armor.
Glorious Suit - +20% HP, gives +5% MATK when used with Glorious Set (Glorious Muffler + Shoes) as well as immunity to frozen status. In addition, gives DemiHuman resist.
Garment
Valkyrian Manteau - Gives Perfect Dodge per upgrade, useful if upgraded to a high level. Card with Raydric Card.
Heroic Backpack - +50 MATK for a garment is pretty good, as well as the extra neutral reductions with 90+ VIT. Card with Raydric Card.
Nydhorgg's Shadow Garb - Gives more SP, resistance to elemental properties. Card with Raydric Card.
Glorious Muffler - +5% HP, gives +5% MATK when used with Glorious Set (Glorious Muffler + Shoes) as well as immunity to frozen status. In addition, gives DemiHuman resist.
Fallen Angel Wings - Gives stats per 20 base stats, can be enchanted with Spell enchants for less variable cast time as well as MATK. Card with Raydric Card.
Shield
Valkyrian Shield - Gives resistances to Fire + Water + Shadow + Undead properties. Card with racial cards (Thara Frog, Teddy Bear, etc.)
Bradium Shield - Heavy, but gives +500 more HP. Card with racial cards (Thara Frog, Teddy Bear, etc.)
Platinum Shield - Chance to reflect magic and -15% damage from Mid/Large Monsters. Not really worth in my opinion, you should get this if you're too lazy to get yourself a shield with Hodremlin Card or racial shields.
Stone Buckler - 5% less damage from large monsters. Card with racial cards (Thara Frog, Teddy Bear, etc.)
Orlean's Server - In use with Orlean's Glove. Card with racial cards (Thara Frog, Teddy Bear, etc.)
Round Buckler - This shield provides a great deal of Defense while maintaining a moderate to low weight. Card with racial cards (Thara Frog, Teddy Bear, etc.)
Immune Shield - Gives reduction to neutral damage per upgrade. Card with racial cards (Thara Frog, Teddy Bear, etc.)
Footgear
Variant Shoes - 20% more SP and HP. Don't upgrade this!
Diabolus Boots - More HP depending on base level, put a Green Ferus/Matyr/Firelock Soldier (if this is +9) Card into it.
Glorious Shoes - +4% HP, gives +5% MATK when used with Glorious Set (Glorious Muffler + Shoes) as well as immunity to frozen status. In addition, gives DemiHuman resist and chance of casting Increase AGI when under attack.
Mora Shoes (Aqua Shoes, Crimson Shoes, etc.) - Gives HP and resistance to the corresponding element of the footgear by 15%. Used usually with the Mora set.
Accessory
Medal of Honor - More HP, gives +5% MATK.
Orlean's Glove - Card slot open, gives DEX and MATK and gives -10% cast reduction if used with Orlean's Server
The Sign - +5% MATK
Bradium Earring - Gives MATK, small amount of INT and DEX, card slot available.
Sprint Ring - 10% less cast time but increase in cast delay.
Buwaya Agimat Tattoo - An end game Accessory that provides an amazing +7% MATK & -7% Fixed Cast Time.
Alchemy Glove - A cheap accessory that gives +10% damage with Crimson Rock/Fire Spells, also has a slot.
Mora Orbs (Aqua Orb, Crimson Orb, etc.) - Can be enchanted for more INT/DEX/MATK/other stats. Gives 15% resistance to the element of the orb, and can autocast a spell related with that element by chance when under attack (Aqua Orb = Frost Nova, Forest Orb = Quagmire, etc.). Used usually with the Mora set.
RWC Pendant - Can be enchanted with Spell enchants, which decrease variable casting time up to 24% as well as giving flat MATK.
Emblem of Elemental Destruction - Decreases variable cast time of skills by 10%, 5% chance of inflicting Frozen status while being physically or magically attacked, reduces damage received from Fire, Earth, Wind and Water element attacks by 5%.
Accessories should ideally be carded with Scaraba Card (Gives +20 MATK).
Weapon
Staff of Destruction - Overall great staff if not for the automatic Jupitel Thunder effect. Has high MATK, gives more MATK but uses more SP per 2 upgrades, -50% cast time for Mystical Amplification
Thorn Staff of Darkness - Use in conjunction with Skull Cap. Reduction in cast delay.
Kronos - Not a bad staff, but Staff of Destruction does more damage. Increase in HP + INT per upgrade.
Glorious Destruction Staff - For leveling in Somatology Laboratory 2 and in Rachel Sanctuary.
Mora Staffs (Aqua Staff, Crimson Staff, Forest Staff, Golden Rod Staff) - Gives an alright amount of MATK, but the bonus in using these is the combination of their respective armors (Aqua Robe, etc.), their footgear (Aqua Shoes, etc.) and their accessory (Aqua Orb, etc.) gives a higher amount of damage with that corresponding element (Aqua = Water). However, you take more damage from your opposing element (Aqua would take 50% more from Wind) and your opposing element skills (Chain Lightning if wearing Aqua Set) does less damage.
Empowered Mora Staffs (Empowered Aqua Staff, etc.) - High amount of MATK, gives INT and enchantable. Also amplifies the damage of the corresponding element by a lot. You can create an empowered mora staff from a regular mora staff by two things: 1) Getting the enchant MATK +2% or INT +4 and 2) +7 minimum on the staff refine, then talking with the Artifact Collector at (Mora 124,82)
Any gears I missed? Just reply with the names of gears that I missed.
2.1 Gameplay
If anyone would like to share gameplay videos of their Warlock in PvM, please post/PM me and I'll put it up here!
Edited by raining, 15 March 2014 - 07:51 AM.